The Events & Registration module lets your church organize and track events of all kinds — from weekly services and Bible studies to one-time retreats and conferences. Members can browse a calendar of upcoming events, while admins can create events, manage registrations, and define locations.
Events Calendar
The Events page shows a full monthly calendar view. All users can browse events connected to their groups and registrations.
Navigating the Calendar
- Open Events from the left sidebar menu.
- The current month is displayed as a grid. Today's date is highlighted with a blue circle so you can orient yourself quickly.
- Use the left and right arrow buttons above the calendar to move to the previous or next month.
- Tap the Today button to jump back to the current month at any time.
- Days that have events show a small indicator. Tap on any day to see the list of events for that date.
Calendar Controls
Month Navigation
Arrow buttons step forward or backward through the calendar (one month, one week, or one day depending on the active view).
Today Button
Returns the view to the current date, regardless of how far you have navigated.
Day Selection
Tap any day cell to expand the event list for that date below the calendar.
Calendar Views
The calendar supports four view modes. Switch between them using the view toggle tabs above the calendar. Your preferred view is remembered between sessions.
Month View
The default view — a traditional monthly grid with colored event chips on each day. Sunday events with multiple time slots are rolled up into compact chips (e.g., "8:30 AM Sunday Service", "10:30 AM Sunday Service") to save space. Click any day to see its full event list below the grid.
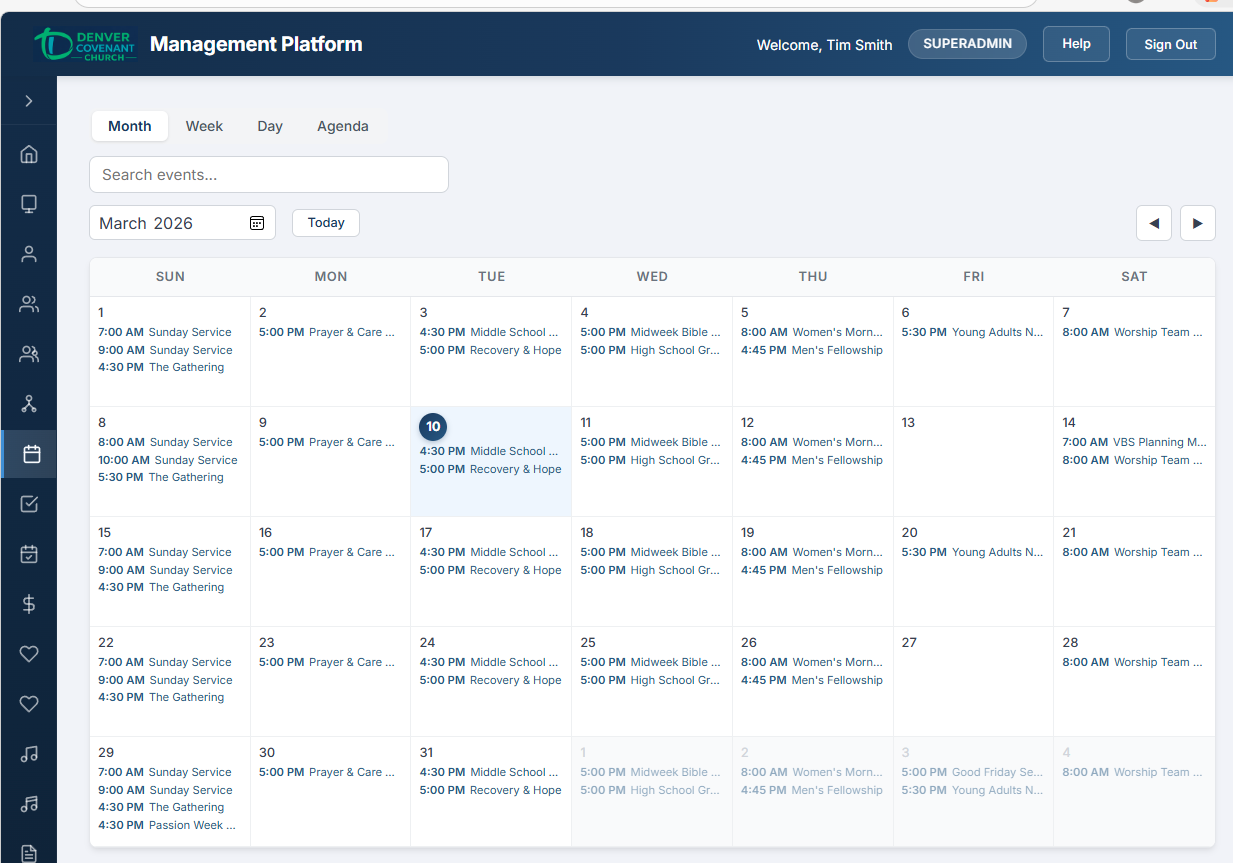
Month view — colored chips show events on each day
Week View
A 7-column time grid showing one week at a time. Each column represents a day (Sunday through Saturday), with events positioned as blocks according to their start and end times. The grid spans 6 AM to 10 PM.
- Events appear as colored blocks spanning their actual duration
- Click a day column header to switch to Day view for that date
- Navigate by week using the arrow buttons
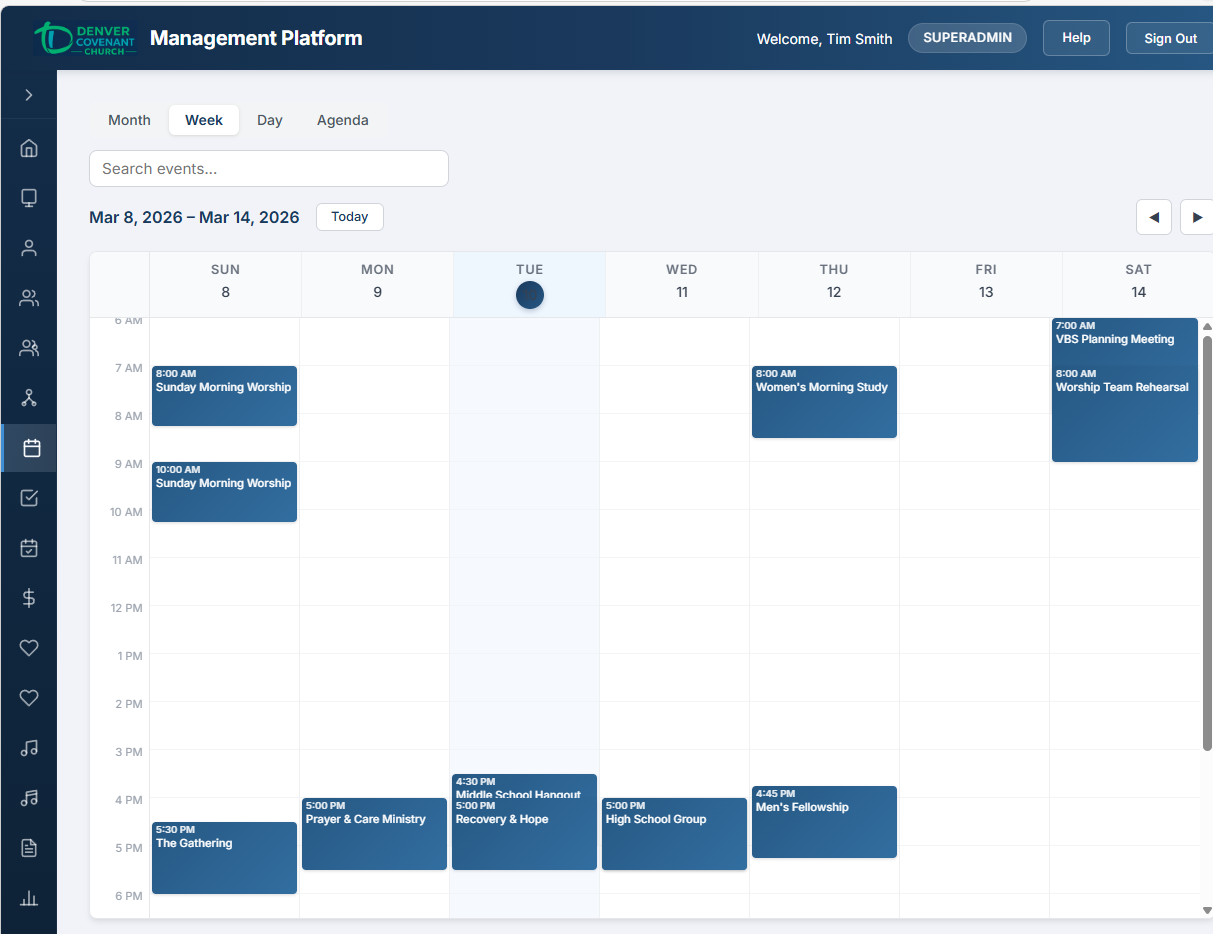
Week view — events positioned as blocks across a 7-day time grid
Day View
A single-column time grid for one day. Overlapping events are arranged side by side in multiple columns so nothing is hidden. Ideal for seeing the full schedule of a busy day at a glance.
- Click any empty time slot to create a new event starting at that time (admin only)
- Overlapping events display in adjacent columns so all are visible
- Navigate day by day using the arrow buttons
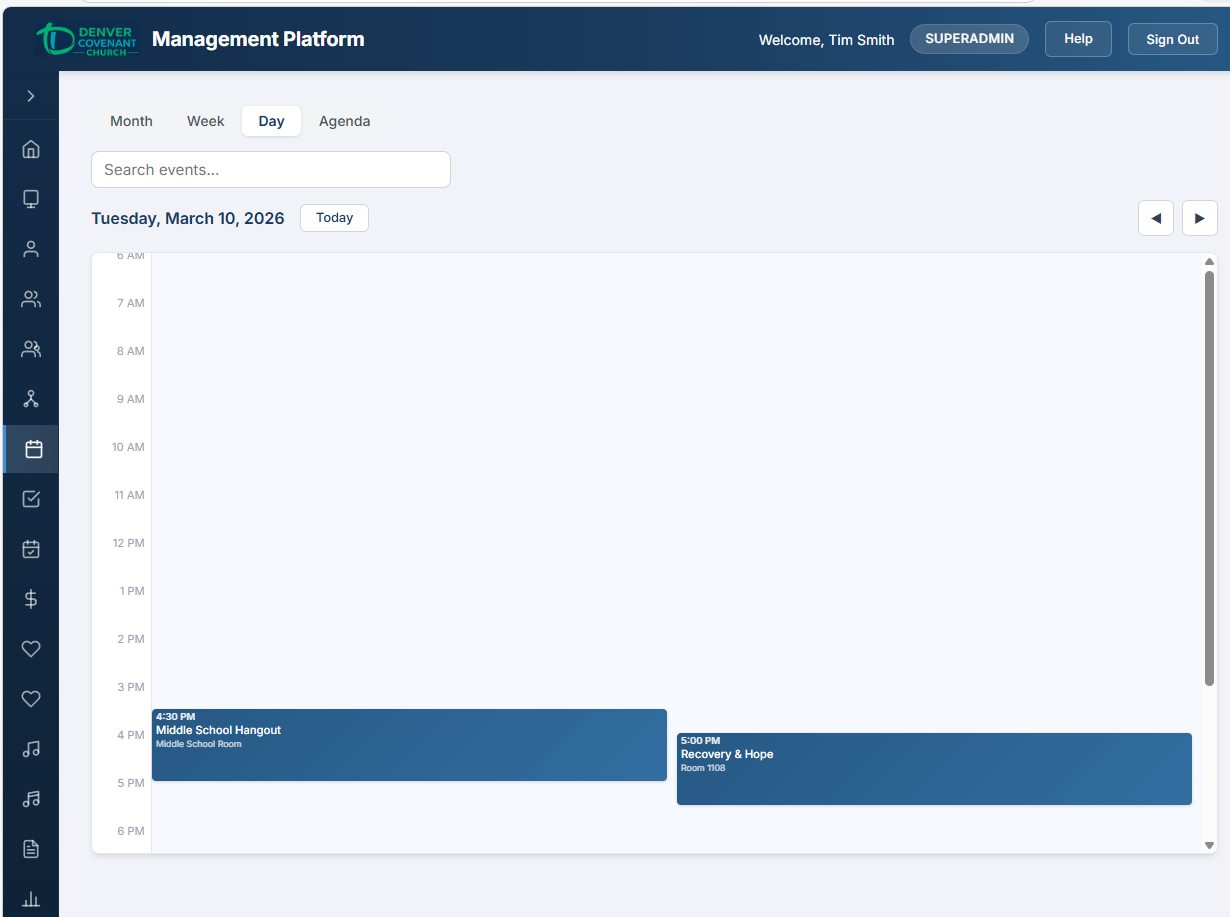
Day view — single-day time grid with events
Agenda View
A flat, scrollable list of events organized by date — the simplest way to see what is coming up. Shows approximately 1 month of past events and 3 months of future events. Each event card shows the name, time, location, and a one-line description preview (if available).
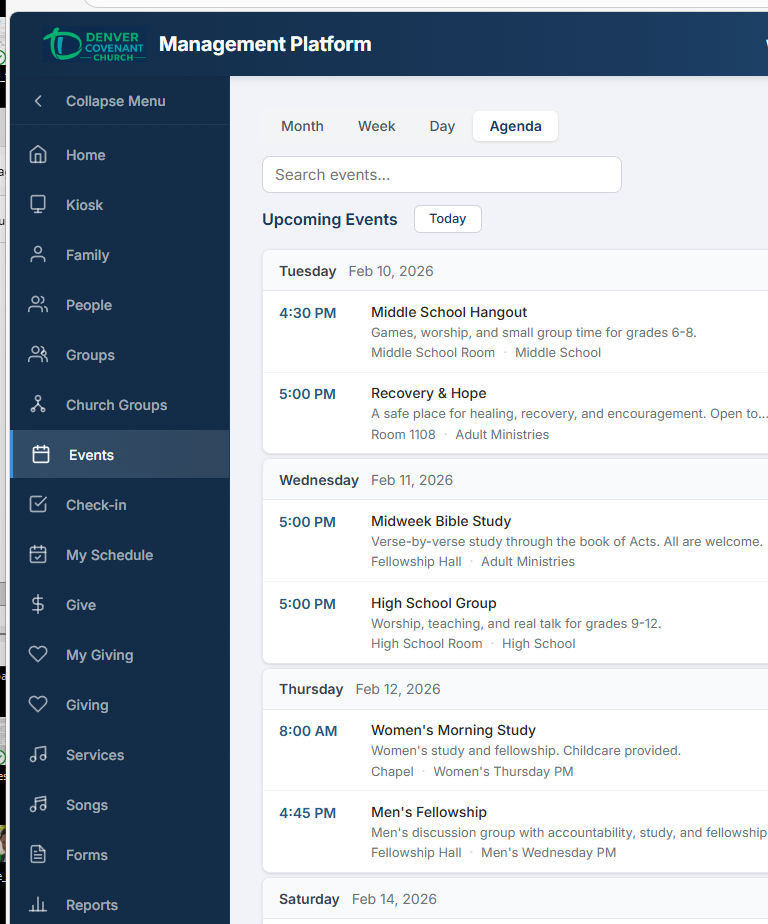
Agenda view with the sidebar expanded — chronological event list with full navigation visible
View Comparison
| View | Best For | Navigation |
|---|---|---|
| Month | Overview of the full month, seeing which days have events | Prev/next month, month picker, Today |
| Week | Planning a specific week, seeing time-of-day layout | Prev/next week, Today |
| Day | Detailed view of one day, finding open time slots | Prev/next day, Today |
| Agenda | Quick scan of upcoming events in a simple list | Scroll (loads 1 month past + 3 months future) |
Event Details
To view details for any event:
- Click on a day cell in the calendar — the events for that day expand below the calendar grid.
- Click on an event row in the day list — a detail modal opens with full event information.
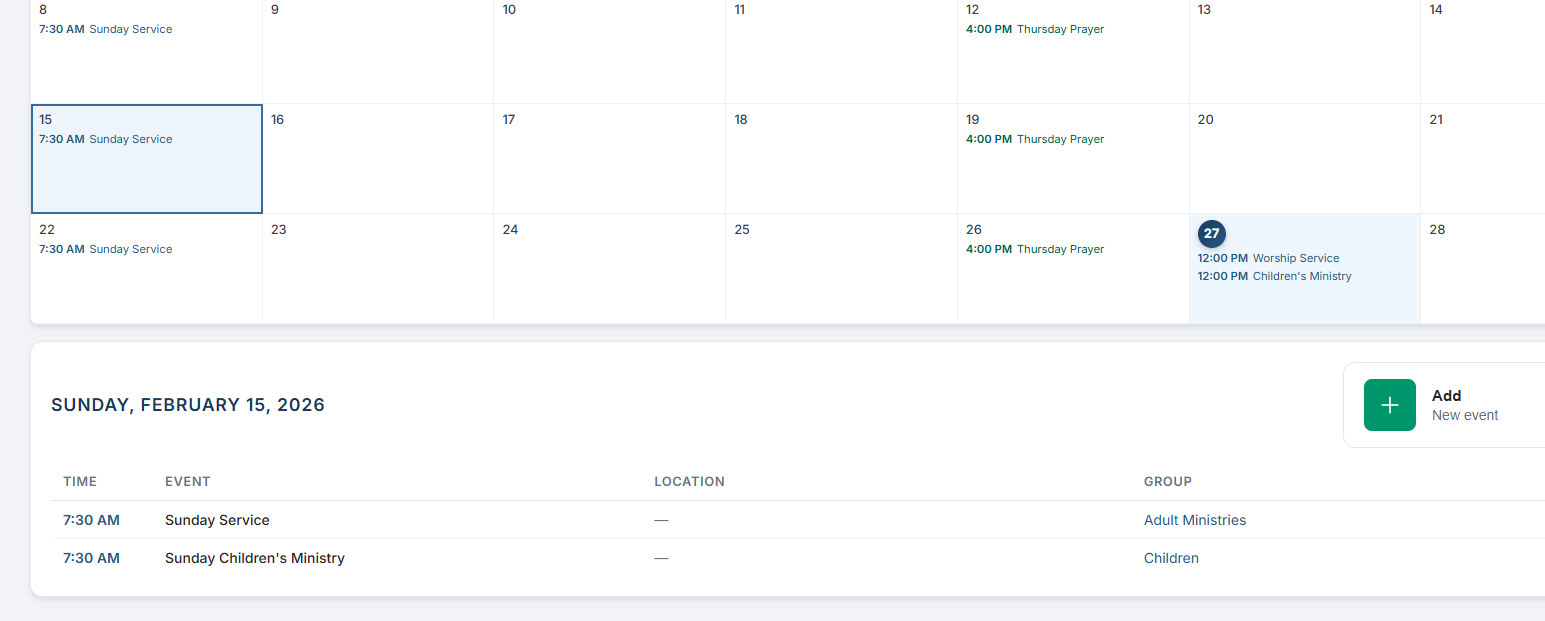
Click a day on the calendar to see its events listed below
What You Will See
| Field | Description |
|---|---|
| Event Name | The title of the event (e.g., "Sunday Children's Ministry", "Thursday Prayer") |
| Date & Time | Start and end date/time for the event |
| Location | Where the event takes place (room, building, and capacity if set) |
| Group | The church group associated with this event, if any |
| Description | Additional information about the event provided by the organizer |
| Registration | Whether registration is open and how many people have signed up |
Attendance & No-Shows (Past Events)
For past events, the detail modal automatically shows attendance derived from kiosk check-in records:
- Attended: N — people who checked in via the kiosk
- No-show: N — people who registered but did not check in
- Registered: N — total registration count
Each person is listed with their name, avatar photo, and a colored badge indicating whether they attended or were a no-show. This gives leaders a quick snapshot of actual turnout vs. registrations.
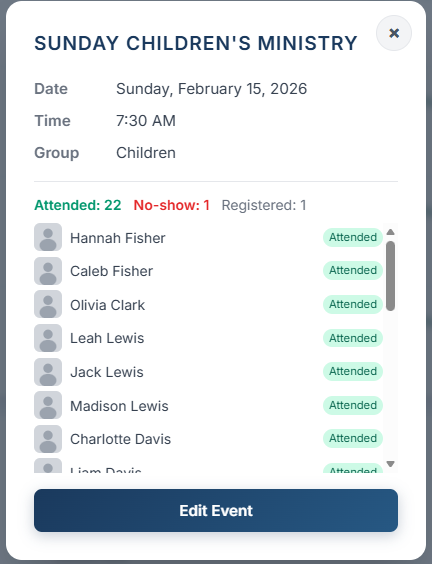
Event detail modal — attendance summary and per-person badges
Who Can Access What
Access to event features is controlled by granular permissions:
| Permission | What It Grants |
|---|---|
events.view | View all events on the calendar, including events outside your own groups |
events.create | Create new events |
events.edit | Edit existing events |
events.delete | Delete events |
events.manage | Full event management (superset of create + edit + delete + registration and location management) |
All authenticated users can browse and view events they are connected to via group membership. The admin features below require the appropriate event permissions.
Event Management Admin
Users with event permissions (events.create, events.edit, events.delete, or events.manage) can create, edit, and delete events from the Events management page. This is where you build your church's event schedule.
Creating a New Event
- Navigate to the Events page from the sidebar.
- Tap + New Event at the top of the event list.
- Fill in the event name. This is the title that will appear on the calendar and in event listings.
- Set the Start Date/Time and End Date/Time. These define when the event runs and when check-in is available.
- Select a Location from the dropdown (optional). Locations are managed separately — see the Locations section below.
- Select a Group from the dropdown (optional). Linking an event to a group means that group's members will see the event on their calendar and can be checked in.
- Optionally link a Form for registration. This connects an existing registration form so people can sign up.
- Add a Description with any additional details attendees should know.
- Tap Save to create the event.
Check-In Window Settings
Each event has an implicit check-in window based on its start and end times. The kiosk and check-in system use these times to determine when people can check in. Events only appear for check-in during their active window.
Editing an Event
- Find the event in the event list (use the search bar to filter by name).
- Tap on the event to open the detail/edit panel on the right side.
- Modify any fields: name, date/time, location, group, form, or description.
- Tap Save to apply changes.
Deleting an Event
- Select the event you want to delete.
- Tap Delete at the bottom of the edit panel.
- Confirm the deletion when prompted. This action cannot be undone.
Event Descriptions Admin
Events can include a text description to provide attendees with additional context — directions, what to bring, special instructions, or any other relevant details.
Adding a Description
- When creating or editing an event, use the Description textarea field.
- Enter any relevant details. The description supports plain text with line breaks preserved.
- Save the event. The description appears in the event detail modal when users click on the event.
Where Descriptions Appear
- Event detail modal — clicking an event on the calendar shows the full description (pre-formatted with line breaks)
- Agenda view — a one-line preview of the description appears below each event card for quick scanning
- Add/edit event forms — the full description textarea is available when creating new events or editing existing ones
Recurring Events Admin
For events that happen on a regular schedule (weekly services, monthly meetings, etc.), you can create recurring events instead of entering each date individually.
Recurrence Types
| Type | Description |
|---|---|
| Daily | Repeats every day |
| Weekdays | Repeats Monday through Friday |
| Sundays | Repeats every Sunday |
| Weekly | Repeats on the same day each week |
| Bi-Weekly | Repeats every two weeks |
| Monthly | Repeats on the same day each month |
Creating a Recurring Event
- Start creating a new event as described above (name, time, location, group).
- In the Recurrence section, select the recurrence type from the dropdown (e.g., Weekly, Monthly).
- Choose a stop condition: either a specific number of occurrences (e.g., 10 sessions) or an end date after which no more events are generated.
- Tap Save. The system creates all individual event occurrences at once, linked together by a shared
recurrence_group_id.
How Recurring Events Work
Each occurrence is a separate event in the database, but they are linked together as a series. This means:
- Each occurrence can be edited individually (e.g., cancel one session without affecting the rest).
- When editing a recurring event, you can choose to apply changes to just the selected occurrence or to all future occurrences in the series.
- The series indicator appears on each event showing it is part of a recurring group.
Managing a Series
Extend Series
Add more occurrences to an existing series by count or by end date. New events inherit the same settings.
Trim Series
Remove future occurrences after a given date. Past events are preserved.
Convert to Recurring
Turn a one-time event into a recurring series by selecting a recurrence type and stop condition.
Registration Management Admin
When events have linked registration forms, admins can view and manage who has signed up.
Viewing Registrations
- Select an event that has a linked registration form.
- The registration count is displayed in the event details, showing how many people have signed up.
- The attendee list shows each registered person with their name and registration details.
Registration Information
| Detail | Description |
|---|---|
| Registrant Name | Full name of each person registered for the event |
| Registration Date | When the person signed up |
| Registration Count | Total number of people registered for the event |
| Form Responses | Answers to any custom questions included on the registration form |
Attendance Tracking
Attendance is tracked automatically through the kiosk check-in system — no manual entry is needed. When people check in at the kiosk, their attendance is recorded against the event. Admins can then view attendance for any past event by clicking it on the calendar (see Event Details above for the attendance summary and badge display).
Locations Admin
Locations define the physical spaces where events take place. Each event can be assigned a location so attendees know where to go and admins can manage room capacity.
Location Properties
| Field | Description |
|---|---|
| Name | The display name of the location (e.g., "Main Sanctuary", "Room 201") |
| Room | Specific room identifier within a building |
| Building | The building where this room is located |
| Capacity | Maximum number of people the space can hold (optional) |
Creating a Location
- Navigate to the location management area (accessible from event creation or the admin settings).
- Tap + Add Location.
- Enter the location name. This is what users will see when browsing events.
- Optionally fill in the room, building, and capacity fields.
- Tap Save to create the location.
Editing a Location
- Find the location in the list.
- Tap to open the edit view.
- Update any fields as needed.
- Tap Save to apply changes.
Deleting a Location
- Select the location to delete.
- Tap Delete.
- Confirm the deletion. Events that were using this location will have their location cleared.