The Services / Worship Planning module equips your church to plan worship services from start to finish — managing song libraries, building service orders, scheduling volunteer teams, and coordinating assignments. Team members can view their upcoming schedules and set blockout dates when they are unavailable, while admins handle the full planning workflow.
services.view (view service plans, song library, and team rosters — read-only) and
services.manage (full management of service types, songs, plans, teams, and schedule assignments).
All team members can view their own schedule and manage their blockout dates regardless of permissions.
The WORSHIP_LEADER role includes services.manage by default.
My Schedule
The My Schedule page is the personal hub for any user who serves on a worship or service team. It provides two tabs: Upcoming Assignments and Blockout Dates.
Upcoming Assignments
View all your upcoming service assignments with dates, teams, positions, and respond to pending requests.
Blockout Dates
Tell the scheduler when you are unavailable so you are not assigned to serve on those dates.
Upcoming Assignments
The Upcoming Assignments tab shows a card for each service you have been scheduled to serve in. Each card includes the key details you need at a glance.
Assignment Card Details
| Field | Description |
|---|---|
| Plan Date | The date of the service plan you are assigned to |
| Service Type | The type of service (e.g., "Sunday Morning", "Wednesday Night") |
| Team & Position | The team you are on and your specific role (e.g., "Worship Team — Lead Vocals") |
| Notes | Any notes the scheduler has added for your assignment (rehearsal times, special instructions, etc.) |
| Status | Your response status, shown as a colored badge |
Status Badges
Each assignment displays one of three status badges:
- PENDING — You have not yet responded. Accept or Decline buttons are shown.
- CONFIRMED — You have accepted this assignment.
- DECLINED — You have declined this assignment. The scheduler will need to find a replacement.
Responding to Assignments
- Open My Schedule from the sidebar and make sure the Upcoming Assignments tab is selected.
- Find the assignment card with a PENDING status.
- Review the plan date, team, position, and any notes from the scheduler.
- Tap Accept to confirm your availability. The badge changes to CONFIRMED.
- Alternatively, tap Decline if you cannot serve. The badge changes to DECLINED and the scheduler is notified.
Blockout Dates
The Blockout Dates tab lets you communicate when you are unavailable to serve. Schedulers see your blockout dates when making assignments, which helps avoid scheduling conflicts.
Adding a Blockout
- Switch to the Blockout Dates tab on the My Schedule page.
- Tap + Add Blockout to open the blockout form.
- Enter a Reason describing why you are unavailable (e.g., "Family vacation", "Out of town for work").
- Toggle the All Day checkbox. When checked, only start and end dates are required (no times). When unchecked, you can specify exact start and end date/time.
- Set the Start Date (or Start Date/Time if not all-day).
- Set the End Date (or End Date/Time if not all-day). The blockout covers the entire range between start and end, inclusive.
- Tap Save to create the blockout.
Blockout Form Fields
| Field | Description |
|---|---|
| Reason | Free-text explanation for the blockout (visible to schedulers) |
| All Day | Checkbox — when on, the blockout covers full days without specific times |
| Start Date / DateTime | When the blockout period begins |
| End Date / DateTime | When the blockout period ends |
Managing Existing Blockouts
All of your current blockout dates are listed below the add form. Each entry shows the reason, date range, and whether it is an all-day blockout. To remove a blockout that is no longer needed, tap the Delete button next to it.
Service Types Admin
Service Types define the different kinds of worship services your church holds. Each service type acts as a container for service plans, teams, and scheduling. Examples include "Sunday Morning Worship", "Wednesday Night Prayer", or "Youth Service".
Service Type Properties
| Field | Description |
|---|---|
| Name | The display name of the service type (e.g., "Sunday Morning") |
| Description | Optional description of what this service type covers |
| Sort Order | Numeric value controlling the display order in lists and dropdowns |
| Active | Toggle to enable or disable the service type. Inactive types are hidden from plan creation and scheduling |
Layout
The Service Types page uses a list-and-edit layout. The left panel shows all service types in a scrollable list. Selecting one opens the edit form on the right. Below the edit form, a summary of linked teams is displayed so you can see which teams are associated with this service type at a glance.
Creating a Service Type
- Navigate to Services from the sidebar and select the Service Types tab.
- Tap + New Service Type above the list.
- Enter the Name (required) and optionally a Description.
- Set the Sort Order to control where this type appears relative to others. Lower numbers appear first.
- Leave the Active toggle on (default). Turn it off only if you want to create the type but not make it available yet.
- Tap Save to create the service type.
Editing a Service Type
- Select the service type from the list on the left.
- Update any fields in the edit panel on the right.
- Tap Save to apply changes.
Song Library Admin
The Song Library is your church's central catalog of worship songs. From here you can search, add, and edit songs that are available to include in service plans.
Layout
The Song Library uses a list-and-edit layout with a debounced search bar at the top. As you type in the search field, the song list filters in real time after a brief pause (debounced to avoid excessive queries). Selecting a song opens its details and edit form on the right.
Song Properties
| Field | Description |
|---|---|
| Title | The song name as it will appear in plans and setlists |
| Author | Songwriter or artist name |
| Key | Musical key — dropdown with all standard keys: C, C#/Db, D, D#/Eb, E, F, F#/Gb, G, G#/Ab, A, A#/Bb, B (plus minor variants) |
| BPM | Beats per minute (tempo) |
| Meter | Time signature — select from 4/4, 3/4, 6/8, or 2/4 |
| CCLI # | Christian Copyright Licensing International number for reporting |
| Copyright | Copyright holder and year |
| Themes | Comma-separated tags for categorization (e.g., "praise, thanksgiving, advent") |
| Notes | Free-text notes visible to worship planners |
| Active | Toggle to show or hide the song from plan selection. Inactive songs are kept in the library but do not appear when adding songs to plans |
Adding a Song
- Navigate to Songs from the sidebar.
- Tap + New Song above the song list.
- Enter the Title (required) and Author.
- Select the Key, BPM, and Meter to capture the musical details.
- Enter the CCLI # and Copyright information for licensing compliance.
- Add any Themes as comma-separated values to help with searching and categorization.
- Tap Save to add the song to the library.
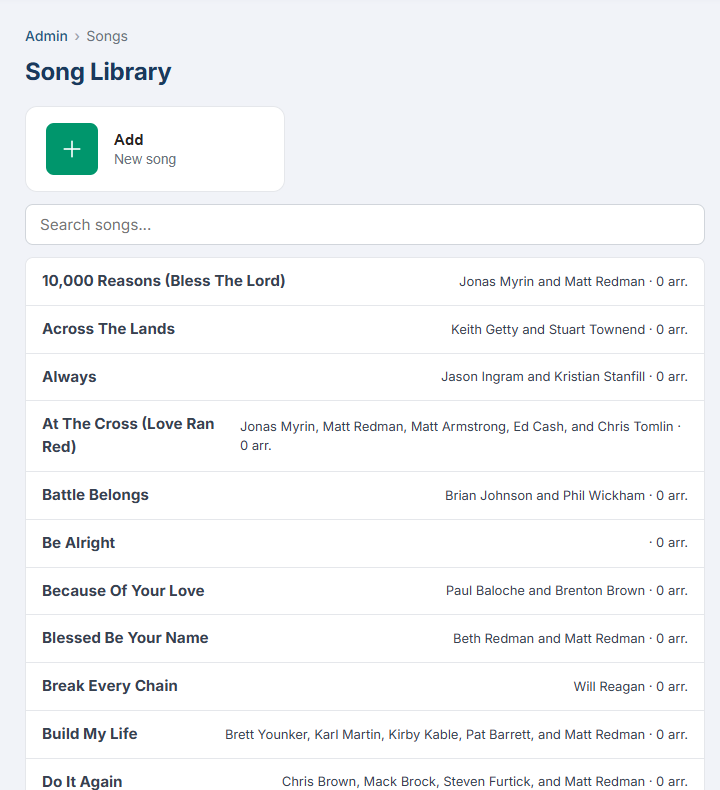
The Song Library with search, list-and-edit layout, and song detail form.
Searching the Library
The search bar at the top of the song list supports searching by title, author, or theme. Results update automatically as you type, with a short debounce delay to keep the interface responsive. Clear the search field to return to the full list.
Song Arrangements Admin
Each song can have multiple arrangements — different versions with their own key, tempo, sequence, chord chart, and lyrics. This allows the same song to be performed in different styles or keys depending on the service context and team capabilities.
Accessing Arrangements
Arrangements are nested under individual songs. After selecting a song in the Song Library, the arrangements section appears below the song details. Each arrangement can be expanded to view and edit its full content.
Arrangement Properties
| Field | Description |
|---|---|
| Name | A label for this arrangement (e.g., "Full Band", "Acoustic", "Keys Only") |
| Key | The musical key for this arrangement (may differ from the song's default key) |
| BPM | Tempo for this specific arrangement |
| Meter | Time signature (4/4, 3/4, 6/8, 2/4) |
| Sequence | The order of song sections, written as shorthand (e.g., V1 C V2 C B C) |
| Chord Chart | Full chord chart displayed in monospace font for easy reading during rehearsal and performance |
| Lyrics | Complete lyrics for this arrangement |
| Notes | Performance notes, dynamics, or other instructions for the team |
| Default | Toggle — marks this as the default arrangement selected when the song is added to a plan |
| Active | Toggle to show or hide this arrangement from selection |
Sequence Notation
The Sequence field uses standard shorthand notation for song structure. Common abbreviations:
V1, V2, V3...
Verse 1, Verse 2, Verse 3, etc.
C
Chorus
B
Bridge
P
Pre-Chorus
T
Tag / Ending
I
Instrumental / Interlude
Example: V1 C V2 C B C C T means Verse 1, Chorus, Verse 2, Chorus, Bridge, Chorus, Chorus, Tag.
Chord Chart Display
The Chord Chart field renders in a monospace (fixed-width) font to preserve alignment between chords and lyrics. This matches the formatting worship musicians expect from printed chord charts:
Creating an Arrangement
- Select a song from the Song Library.
- In the arrangements section below the song details, tap + New Arrangement.
- Enter a Name that distinguishes this arrangement (e.g., "Key of G — Full Band").
- Set the Key, BPM, and Meter for this specific arrangement.
- Enter the Sequence using the shorthand notation described above.
- Paste or type the Chord Chart and Lyrics.
- Toggle Default on if this should be the arrangement automatically selected when the song is added to a plan.
- Tap Save to create the arrangement.
Service Plans Admin
Service Plans are the core of worship planning. Each plan represents one specific service — a particular date and service type — and contains the order of service (items to be performed) and the team assignments (who is serving).
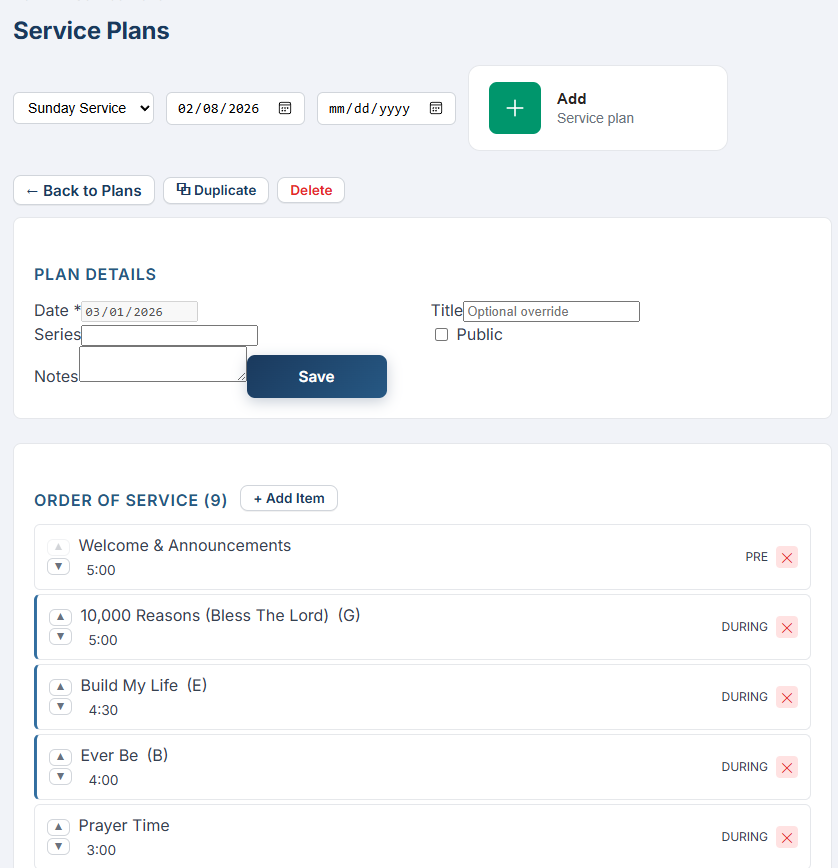
A service plan showing the order of service (songs, headers, custom items) and team scheduling section.
Browsing Plans
- Navigate to Service Plans from the sidebar.
- Select a Service Type from the dropdown to filter plans (e.g., "Sunday Morning").
- Optionally set a Date Range filter to narrow the list to a specific time period.
- The plan list updates to show matching plans, ordered by date.
Plan List Columns
| Column | Description |
|---|---|
| Date | The date of the service |
| Title | Optional plan title (e.g., "Easter Sunday Service") |
| Series | If the plan is part of a sermon series, the series name appears here |
| Items | The number of items in the order of service |
| Assignments | The number of team members assigned to this plan |
Creating a Service Plan
- With a service type selected, tap + New Plan.
- Set the Date for the service.
- Enter an optional Title (helpful for special services like holidays or guest speakers).
- Enter an optional Series name if this plan is part of a multi-week series.
- Toggle Public on if you want this plan to be visible to all team members (not just admins). When off, only admins can see the plan until it is ready to share.
- Add any Notes for the planning team (e.g., "Rehearsal at 4pm Saturday").
- Tap Save to create the plan. You can then add items and assignments.
Plan Detail Fields
| Field | Description |
|---|---|
| Date | The date of the service (required) |
| Title | Optional title for the plan |
| Series | Optional series name for multi-week grouping |
| Public | Checkbox — when on, the plan and its details are visible to assigned team members |
| Notes | Internal notes visible to admins and team leads |
Order of Service Admin
Within each service plan, the Order of Service defines the sequence of items that make up the service — songs, headers, custom items, and more. Items are organized by position (Pre-Service, During, or Post-Service) and can be reordered with up/down arrows.
Item Types
Song
A worship song from the library. When selected, you choose the key and arrangement. Duration and notes can be customized.
Header
A section divider for visual organization (e.g., "Worship Set", "Message", "Response"). Does not represent a performable item.
Custom Item
Any non-song item such as a prayer, Scripture reading, announcements, communion, offering, or video. Fully customizable title, duration, and notes.
Item Properties
| Field | Description |
|---|---|
| Type | Song, Header, or Custom Item |
| Position | Pre-Service, During, or Post-Service — determines which phase of the service this item belongs to |
| Title | For songs, this is auto-filled from the song library. For headers and custom items, you enter the title |
| Song / Arrangement | Song items only — select the song from the library and optionally change the arrangement from the default |
| Key | Song items only — the key for this performance (defaults to the arrangement key but can be overridden) |
| Duration | Estimated duration in minutes (helps with service timing) |
| Notes | Item-specific notes (e.g., "Start soft, build to full band", "Pastor John speaking") |
Adding Items to the Order
- Open the service plan you want to edit.
- In the Order of Service section, tap + Add Item.
- Select the Item Type: Song, Header, or Custom Item.
- For Song items: search for the song in the library. The default arrangement is pre-selected. Optionally change the arrangement or key.
- For Header or Custom Item: enter a descriptive title.
- Select the Position (Pre-Service, During, or Post-Service).
- Set the estimated Duration in minutes and add any Notes.
- Tap Save. The item appears in the order list at the bottom of its position group.
Reordering Items
Each item in the order has up and down arrow buttons on the left side. Tap the up arrow to move an item higher in the order, or the down arrow to move it lower. Items stay within their position group (Pre-Service, During, Post-Service) — reordering only affects the sequence within the same group.
Example Order of Service
| # | Position | Type | Title | Duration |
|---|---|---|---|---|
| 1 | Pre-Service | Custom | Background Music / Slides | 15 min |
| 2 | During | Header | Worship Set | — |
| 3 | During | Song | Build My Life (Key of G) | 6 min |
| 4 | During | Song | Good Good Father (Key of A) | 5 min |
| 5 | During | Song | What a Beautiful Name (Key of D) | 7 min |
| 6 | During | Custom | Prayer & Offering | 8 min |
| 7 | During | Header | Message | — |
| 8 | During | Custom | Sermon — "Grace Abounds" | 35 min |
| 9 | During | Header | Response | — |
| 10 | During | Song | Amazing Grace (Key of G) | 5 min |
| 11 | During | Custom | Benediction | 2 min |
| 12 | Post-Service | Custom | Exit Music | 10 min |
Team Scheduling Admin
The Team Scheduling section within each service plan is where you assign people to serve. Assignments are organized by service team, and each team shows its positions and who is filling them.
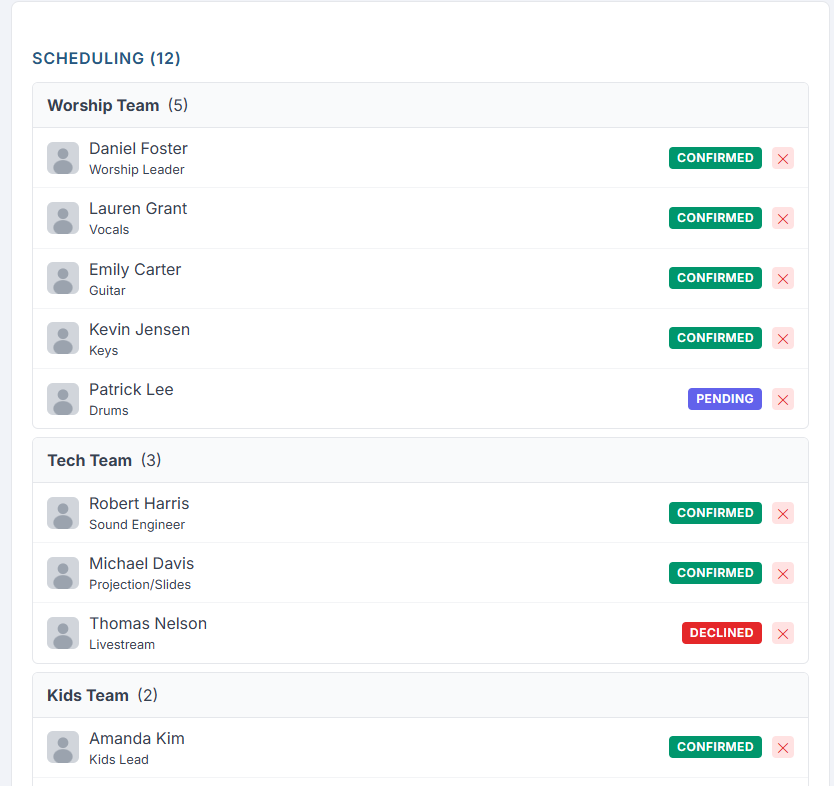
Team assignments within a service plan — positions, assigned people, and response status badges.
How Teams Are Organized
Service teams are created under a specific service type (see Service Types). Each team has named positions (e.g., "Lead Vocals", "Drums", "Sound Tech"). When scheduling a plan, you see all teams that belong to the plan's service type, grouped together with their positions and current assignments.
Team Assignment Display
Within each team group, assignments are listed showing:
- Person photo — the assigned person's profile picture (or default silhouette if no photo)
- Person name — full name of the assigned team member
- Position — the team position they are filling
- Status badge — color-coded response status:
- PENDING — the person has not yet responded
- CONFIRMED — the person accepted the assignment
- DECLINED — the person declined and needs a replacement
Assigning a Person
- Open the service plan and scroll to the Team Scheduling section.
- Find the team and position you want to fill.
- Tap + Add Person next to the position.
- A search dialog appears. Type the person's name to search. Only people who are members of the selected team are shown in results.
- Select the person from the search results. They are immediately assigned with a PENDING status.
- The assigned person will see the assignment on their My Schedule page and can Accept or Decline.
Managing Assignments
Remove Assignment
Remove a person from their position if they are no longer needed or if you need to assign someone else.
View Blockouts
When assigning, team members with blockout dates overlapping the plan date are flagged so you can avoid scheduling conflicts.
Track Responses
Monitor the status badges across all teams. Quickly identify positions that still need confirmation or have been declined.
Scheduling Best Practices
- Check blockout dates before assigning — the system flags members who are unavailable, saving you from back-and-forth communication.
- Assign teams at least two weeks in advance so members have time to prepare and respond.
- After assignments are made, toggle the plan to Public so team members can see the full plan details (order of service, song keys, notes).
- Review the status badges regularly as the service date approaches. Follow up with any assignments that remain PENDING close to the date.
- Rotate team members across weeks to avoid burnout. Review past plans to see who has served recently.