The Kiosk Check-In module provides a streamlined, touch-friendly check-in experience for Sunday mornings and special events. Families use a public kiosk to check in their children and volunteers by phone number, while admins have a search-based interface for walk-in visitors and special situations. The system prints labels for child safety and tracks all check-in history.
checkin.view (view check-in history and calendar),
checkin.run (operate the admin kiosk and process check-ins), and
checkin.manage (full check-in management including visitor assignment and admin calendar).
The public kiosk is unauthenticated — no login or permissions are required to use it.
Welcome Screen
The public kiosk opens to a full-screen welcome display designed to be visible from across a lobby. This is the idle state of the kiosk when no one is actively checking in.
What You Will See
The screen shows a bold blue gradient background with a large “Welcome” message centered on the display. There are no buttons, menus, or navigation elements — just a clean, inviting prompt.

The kiosk welcome screen — tap anywhere to begin check-in.
Full-Screen Display
The welcome screen fills the entire browser window with a blue gradient, optimized for wall-mounted tablets or touchscreen monitors.
Tap Anywhere to Begin
Touching or clicking anywhere on the welcome screen advances to the phone entry keypad. No specific button target is needed.
Inactivity Timeout
If no interaction occurs for 30 seconds at any point during check-in, the kiosk automatically returns to this welcome screen.
Phone Entry
After tapping the welcome screen, the kiosk displays a phone keypad where families enter their phone number to look up their family record.

The on-screen phone keypad with large, touch-friendly buttons.
Using the Keypad
- Tap on the welcome screen to begin. The on-screen phone keypad appears.
- Enter your phone number using the large on-screen 10-key pad. Each digit press is displayed at the top of the keypad area.
- If you make a mistake, tap the Backspace button to delete the last digit entered.
- Once you have entered your full phone number, tap the Enter button (or press Enter on a physical keyboard) to search.
- The system looks up your phone number and finds the matching family. If found, you proceed to the family check-in screen.
Input Methods
| Method | Description |
|---|---|
| On-Screen Keypad | Large touch-friendly 10-key number pad with Backspace and Enter buttons. Designed for touchscreen tablets and monitors. |
| Physical Keyboard | Number keys and the Enter key on a connected keyboard also work. Useful for kiosk setups with an attached keyboard. |
Check-In
Once a family is found by phone number, the kiosk displays a check-in screen showing all family members and the events available for check-in right now.
Family Check-In Layout
The check-in screen uses a row-based layout. Each family member occupies one row:
- Left side — the person's name, photo (if available), and relevant details (age, grade, allergies)
- Right side — event tiles showing the events currently available for that person to check into
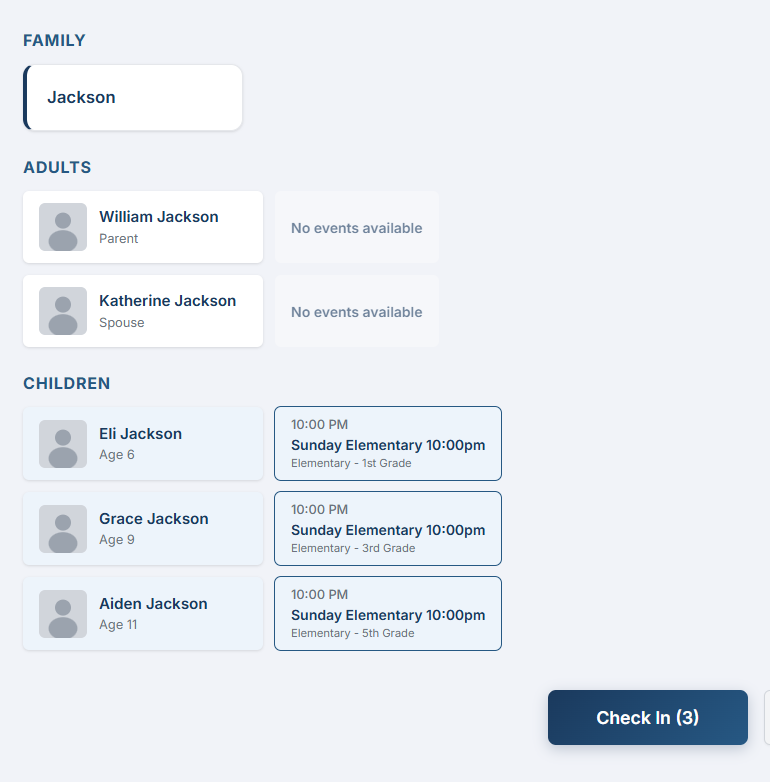
The family check-in screen — adults are shown at top, children below with their eligible events and grade groups.
Selecting Events
- Review the family members listed on screen. Each person's row shows the events they are eligible to check into based on their group memberships and the current event schedule.
- Tap on an event tile to select that person for that event. The tile highlights to show it is selected.
- Tap again to deselect if you change your mind.
- If a person is only eligible for a single event, that event is automatically pre-selected for convenience.
- Once you have selected all the desired person/event combinations, tap the Check In button at the bottom of the screen.
After Check-In
When you tap Check In, the system processes all selected check-ins at once. The screen updates to show the results:
- Successfully checked-in people are shown with a green background and their security code displayed prominently.
- Labels print automatically if a label printer is connected (see Labels section below).
- The family can review their security codes on screen before walking away.
Labels
The kiosk system generates printable labels after each check-in. Labels are sized for standard 4″×2″ thermal label stock, designed for the Zebra ZD421 label printer. There are three label types, each tailored to its purpose.
Child Label
Printed for each child who is checked in. Contains all the information a children's ministry volunteer needs at a glance.
| Element | Description |
|---|---|
| First Name | Displayed large and bold at the top for easy identification from a distance |
| Last Name | Shown below the first name in a smaller size |
| Allergies | Printed in red, bold text if any allergies are on file. Omitted entirely if no allergies exist |
| Event Time & Room | The event start time and the assigned room/location name |
| Security Code | Displayed at the bottom of the label. This code must match the parent pickup ticket |
Parent Pickup Ticket
Printed for the parent or guardian after checking in children. The ticket has two identical halves separated by a dashed divider line, designed to be torn apart — one half stays with the parent and one can be given to a second authorized pickup person if needed.
| Element | Description |
|---|---|
| Security Code | Same code as the child label. The children's ministry volunteer matches this code at pickup |
| Date | The date of the check-in for reference |
| Dashed Divider | Separates the two identical halves of the ticket for tearing |
| Footer | “Keep this ticket to pick up your child(ren)” |
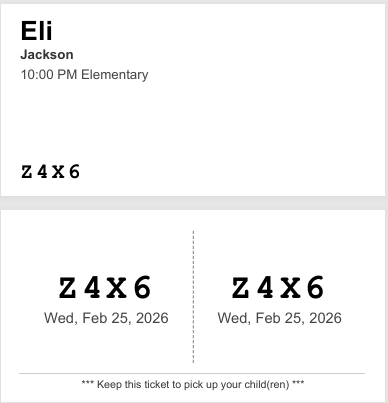
A printed label — child tag on top with name and event, parent pickup ticket below with matching security code.
Volunteer Badge
Printed for adult volunteers who check in for a serving assignment. The badge is simpler than a child label — no security code is needed since volunteers do not require pickup verification.
| Element | Description |
|---|---|
| First Name | Centered, displayed in large bold text |
| Last Name | Centered below the first name |
| Group Name | The name of the serving group or team (e.g., “Worship Team”, “Greeters”) |
| Time & Date | The event time and date of the check-in |
Check-In History: Family / Just Me
All logged-in users can view their check-in history from the Check-In History page. This is accessed from within the main application (not the public kiosk) and shows past check-in records.
Tabs
Family Tab
Shows check-in records for all members of your family. Useful for parents who want to see when their children were checked in and by whom.
Just Me Tab
Filters the history to only your own check-in records. Handy for volunteers who want to see their personal serving history.
History Table
Both tabs display the same table format with the following columns:
| Column | Description |
|---|---|
| Person | The name of the person who was checked in |
| Event | The event they were checked into (e.g., “Kids Church 9 AM”) |
| Date | The date of the check-in |
| Time | The time the check-in was recorded |
| Security Code | The security code assigned for that check-in (for children) |
Check-In History: Admin Calendar Admin
Admins have an additional All tab on the Check-In History page that provides an organization-wide view of all check-ins across all families.
Calendar View
- Navigate to the Check-In History page and select the All tab.
- A monthly calendar is displayed. Days that had check-ins are marked with an indicator showing activity occurred.
- Use the month navigation arrows to browse forward or backward through past months.
- Click on any day that has check-in activity to expand the detailed check-in records for that date.
Admin Detail Table
When a day is selected, a comprehensive 11-column table is displayed with full details for every check-in that occurred on that date:
| Column | Description |
|---|---|
| Person | Full name of the checked-in individual |
| Family | Family name for context |
| Event | Name of the event |
| Group | The group associated with the event |
| Location | Room or building where the event took place |
| Check-In Time | Exact time the check-in was recorded |
| Check-Out Time | When the person was checked out (if applicable) |
| Security Code | The assigned security code |
| Checked In By | Who performed the check-in (kiosk or admin name) |
| Label Printed | Whether a label was printed for this check-in |
| Notes | Any notes attached to the check-in record |
Admin Kiosk Admin
The Admin Kiosk is a staff-facing check-in interface accessible from within the main application. Unlike the public kiosk which uses phone number lookup, the Admin Kiosk lets staff search for anyone by name, phone number, or email address.
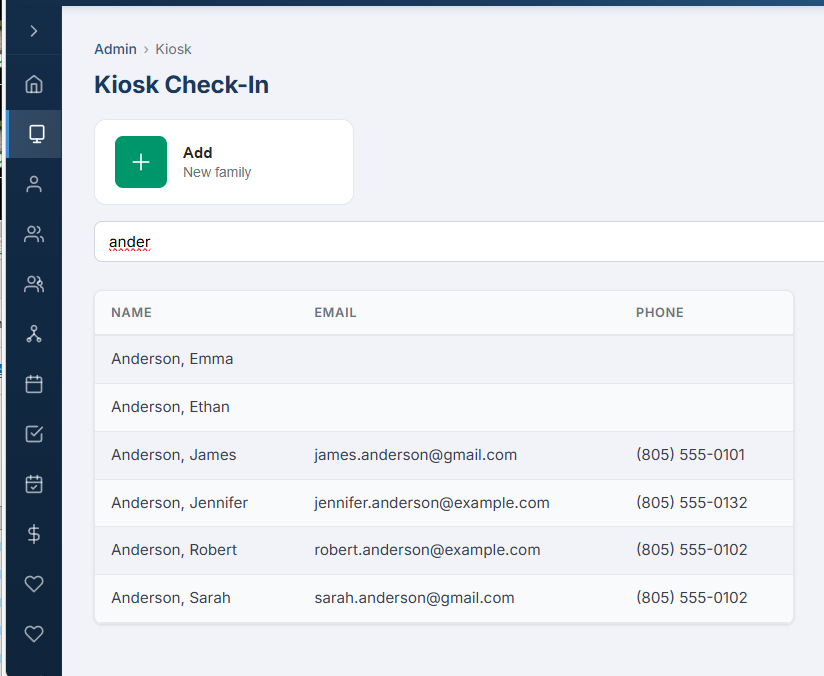
The Admin Kiosk — search by name, phone, or email with an Add Family button for walk-ins.
Search-Based Lookup
- Navigate to the Admin Kiosk page from the sidebar.
- Type a name, phone number, or email address into the search bar. Results appear as you type.
- Select the family from the search results to load their check-in screen.
Adding Walk-In Visitors
When a new family arrives who is not yet in the system, admins can create their records on the spot:
- Tap the Add Family button at the top of the Admin Kiosk page.
- A guided family creation flow walks you through entering the family name, parents, and children.
- Once saved, the new family is immediately available for check-in.
- The kiosk returns to the search screen with the new family pre-loaded, ready to check in.
Compared to Public Kiosk
| Feature | Public Kiosk | Admin Kiosk |
|---|---|---|
| Lookup Method | Phone number keypad only | Search by name, phone, or email |
| Add New Family | Not available | Yes, via Add Family button |
| Inactivity Timeout | 30 seconds | None |
| Authentication | No login required (public URL) | Requires admin login |
| Page Refresh | Returns to welcome screen | Survives refresh (URL params) |
Admin Check-In Admin
Once a family is selected in the Admin Kiosk, the admin check-in screen appears. It uses the same row-based layout as the public kiosk (person info on the left, event tiles on the right) but is wrapped within the admin interface with additional tools.
Check-In Process
- Review the family members and their available events, just as on the public kiosk.
- Tap event tiles to select person/event combinations for check-in.
- Tap the Check In button to process all selected check-ins.
- Security codes and confirmation appear for each checked-in person.
Family Actions
The admin check-in screen includes a Family Actions dropdown menu with additional options not available on the public kiosk:
Edit Family
Opens the full family edit page to update family members, contacts, or other details. Navigates away from the kiosk and returns when done.
Authorized Pickup People
View and manage the list of people authorized to pick up children in this family. Critical for child safety policies.
Reprint Labels
Reprint labels for any previously checked-in family member. Useful when a label is lost, damaged, or the printer had an issue during the original check-in.
Visitor Assignment Admin
When new families check in for the first time, their children are placed in a temporary visitor group. The Visitor Assignment tool lets admins move these children into their correct permanent grade-level groups after the service.
How It Works
- Navigate to the Visitor Assignment page from the admin sidebar.
- Use the date picker at the top to select the date you want to review. It defaults to today.
- A table displays all visitor children who checked in on the selected date, showing their name and the temporary visitor group they were assigned to.
- For each child, select the correct permanent group from the Target Group dropdown. This dropdown lists all available grade-level and age-appropriate groups.
- Once a target group is selected and confirmed, the child is moved from the visitor group to their new permanent group.
- The row fades to green and then disappears from the table, providing clear visual feedback that the assignment was successful.
Visitor Table Columns
| Column | Description |
|---|---|
| Child Name | Full name of the visitor child |
| Current Group | The temporary visitor group they were placed in during check-in |
| Target Group | Dropdown to select the permanent grade-level group the child should be assigned to |