The Giving & Donations module enables your church to accept online donations through multiple payment processors (Stripe for card, bank ACH, Apple Pay, and Google Pay; PayPal for PayPal balance and linked accounts), set up recurring subscriptions, record offline gifts (cash, check), and provide donors with a complete history of their contributions. Admins have access to a full reporting dashboard with yearly summaries, fund breakdowns, recurring gift management, and manual entry tools for recording gifts received outside of the online system.
giving.view (view your own giving history),
giving.view_all (view all donors’ giving records),
giving.manage (manage funds, record manual donations, and administer all giving features), and
giving.export (download giving data for external reporting).
All authenticated users can make donations — the Give page requires no special permission.
The FINANCE_MANAGER role includes all giving permissions; FINANCE_VIEWER gets read-only access.
Online Giving
One-time and recurring donations via Stripe (card, bank ACH, Apple Pay, Google Pay) and PayPal. Plus Zelle, Venmo, and Cash App. Fund selection and optional anonymity.
Recurring Gifts
Set up recurring subscriptions (weekly, bi-weekly, monthly, quarterly, annually) via Stripe. Manage, view, and cancel from My Giving.
Giving History
Donors can review their personal giving history and active recurring subscriptions, filtered by year, with summary statistics.
Admin Dashboard
Year-at-a-glance statistics, monthly trends, fund breakdowns, payment method analysis, and recurring gift management.
Manual Entry
Record cash, check, and other offline donations with person search and detailed metadata.
Making a Donation
The Give page provides a clean, centered card layout where any authenticated user can make a one-time or recurring donation to the church. Multiple payment methods are supported: Stripe for credit/debit cards, bank ACH transfers, Apple Pay, and Google Pay; and PayPal for PayPal balance and linked accounts. Alternative methods like Zelle, Venmo, Cash App, and direct bank ACH are also available.
Give Page Layout
The donation form is presented as a single centered card with the following elements:
| Element | Description |
|---|---|
| Fund Dropdown | Select which fund to direct your gift to. Only active funds are shown. The default fund is pre-selected when the page loads |
| Amount Input | Enter a custom dollar amount. The field displays a $ prefix for clarity |
| Quick-Amount Buttons | Five preset buttons — $25 $50 $100 $250 $500 — that instantly fill the amount field when tapped |
| Recurring Toggle | A Make this recurring switch. When enabled, a frequency selector appears (Weekly, Bi-weekly, Monthly, Quarterly, Annually). Recurring gifts use Stripe only; the PayPal tab is hidden when recurring is on |
| Anonymous Checkbox | When checked, the donation is recorded without associating it to your account. Admins see the gift in reports but not the donor's identity |
| Payment Method Tabs | Three tabs for one-time gifts: Card / Wallet (Stripe — credit/debit cards, Apple Pay, Google Pay), Bank Transfer (Stripe ACH), and PayPal. When recurring is enabled, only the Card / Wallet and Bank Transfer tabs are available |
Making a One-Time Gift
- Navigate to Give from the sidebar.
- Select a Fund from the dropdown. The default fund is pre-selected, but you can choose a different one if your church has multiple active funds (e.g., General Fund, Building Fund, Missions).
- Enter a donation amount by typing in the amount field or tapping one of the quick-amount buttons: $25, $50, $100, $250, or $500.
- Optionally check Give Anonymously if you prefer your identity not to be recorded with this donation.
- Choose a payment method tab: Card / Wallet (Stripe), Bank Transfer (Stripe ACH), or PayPal.
- For Stripe tabs, enter your payment details in the secure Stripe form and tap Donate. For PayPal, complete the payment in the PayPal popup.
- After successful payment, the Give page displays a thank-you confirmation screen showing the amount donated and the fund it was directed to.
Setting Up a Recurring Gift
- Navigate to Give from the sidebar.
- Select a Fund and enter a donation amount.
- Toggle Make this recurring on. A frequency selector appears.
- Choose a frequency: Weekly, Bi-weekly, Monthly, Quarterly, or Annually.
- Enter your payment details in the Stripe form (Card / Wallet or Bank Transfer) and tap Subscribe.
- Your recurring gift is now active. Future charges happen automatically at the selected frequency. Each charge creates a donation record in your giving history.
After a Successful Donation
The confirmation screen shows a thank-you message with the donation amount and fund name. A Give Again button is displayed, allowing you to make another donation immediately. The form resets to its default state (default fund selected, amount cleared, anonymous unchecked).
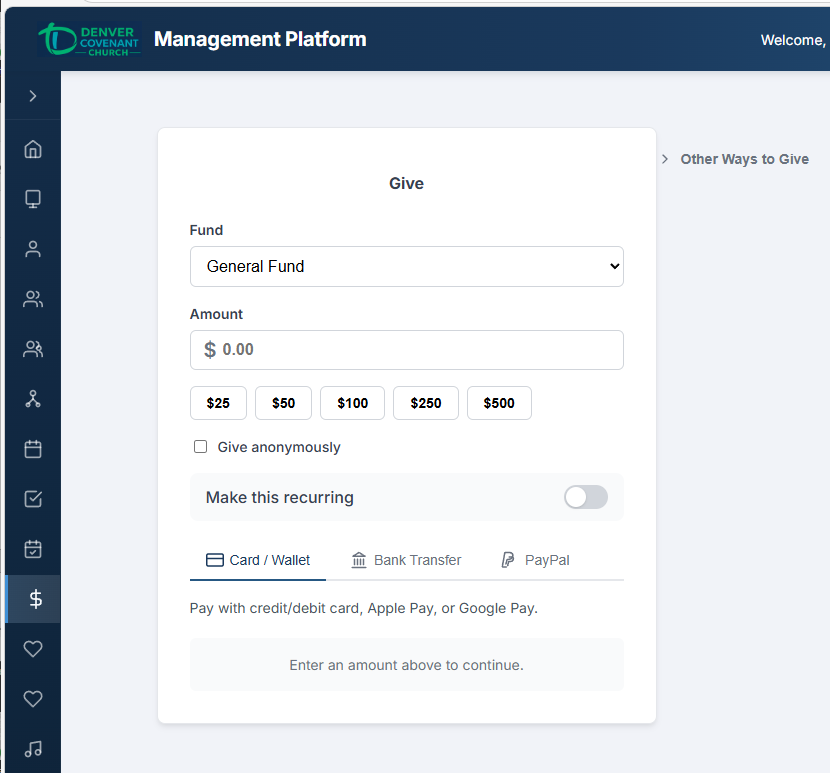
The Give page with fund selection, quick-amount buttons, and payment method tabs.
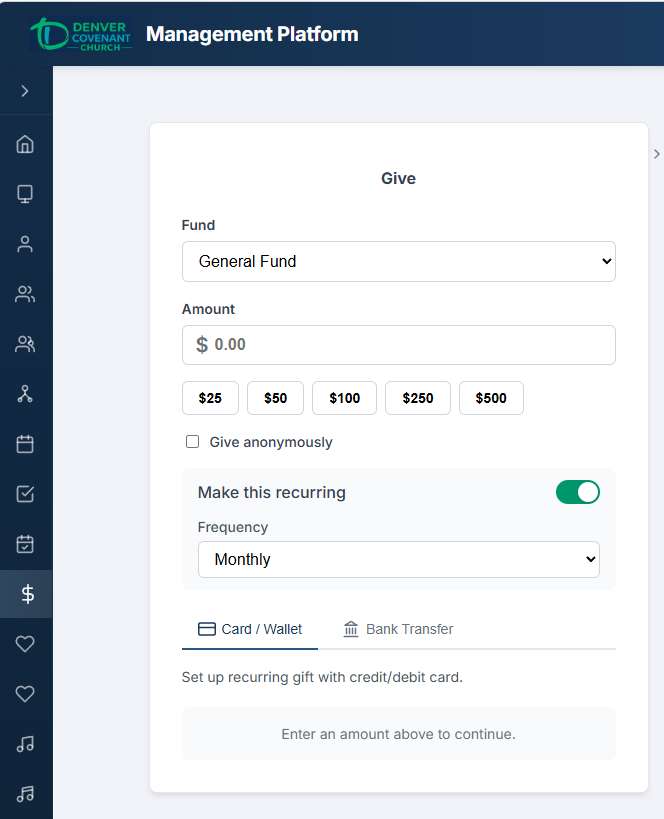
Recurring gift setup with frequency selector (Weekly, Bi-weekly, Monthly, Quarterly, Annually).
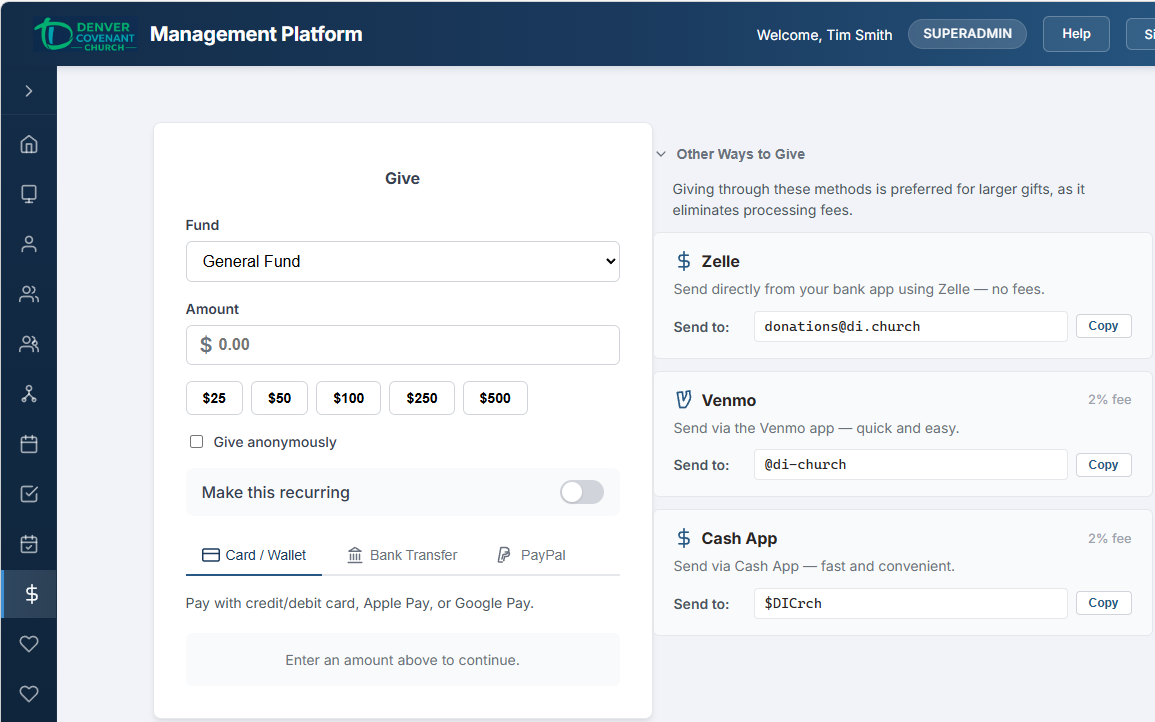
Collapsible “Other Ways to Give” section showing Zelle, Venmo, and bank ACH transfer options.
My Giving History
The My Giving page gives donors a complete view of their personal giving history. It provides year-by-year summaries and a detailed list of every donation on record.
Year Filter
A dropdown at the top of the page lets you select which year to view. It includes the current year plus the four previous years. When you change the year, the summary cards and donations table update to reflect only donations from that year.
Summary Cards
Three summary cards are displayed at the top of the page, providing at-a-glance statistics for the selected year:
Total Given
The sum of all your completed donations for the selected year, displayed as a dollar amount.
Number of Donations
A count of how many individual donations you made during the selected year.
Average Gift
Your average donation amount for the year (total given divided by number of donations).
Donations Table
Below the summary cards, a table lists every donation for the selected year with the following columns:
| Column | Description |
|---|---|
| Date | The date the donation was made |
| Fund | Which fund the donation was directed to (e.g., General Fund, Missions) |
| Amount | The dollar amount of the donation |
| Payment Method | How the donation was made (PayPal, Cash, Check, Other) |
| Status | The current status of the donation, shown as a colored badge |
Status Badges
Each donation displays one of four status badges:
- COMPLETED — The payment was successfully processed and received.
- PENDING — The payment is still being processed (e.g., waiting for PayPal confirmation).
- REFUNDED — The donation was returned to the donor.
- FAILED — The payment attempt was unsuccessful.
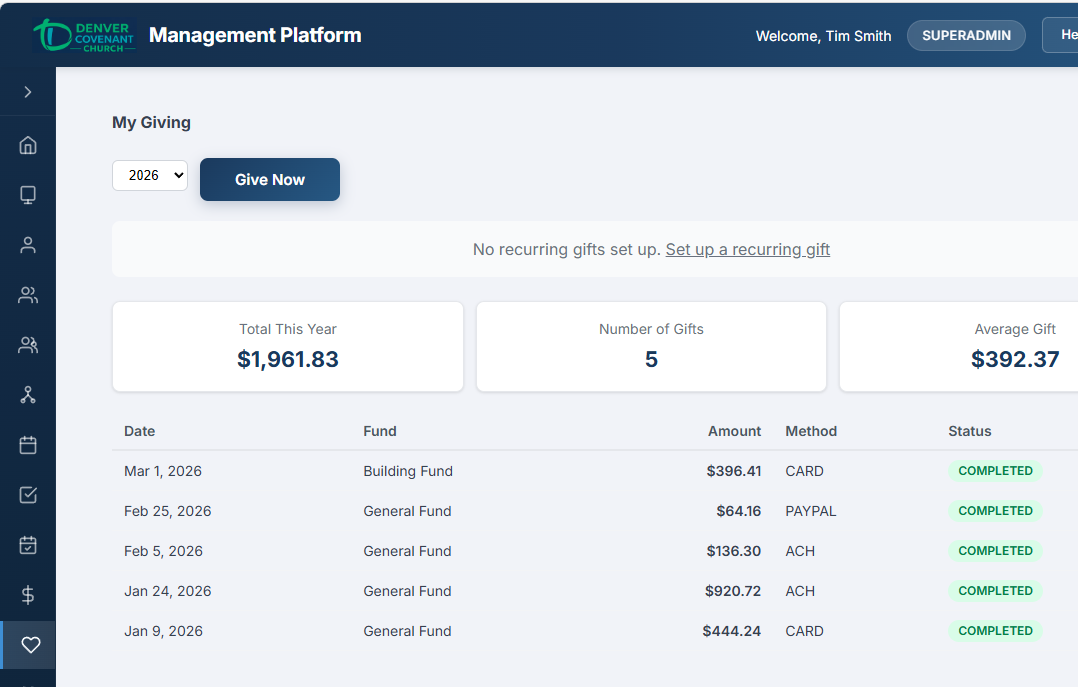
Personal giving history with year filter, summary cards, and detailed donation table.
Recurring Gifts Section
Above the one-time donation history, a Recurring Gifts section displays all your recurring subscriptions. Each recurring gift is shown as a card with:
- Amount and frequency — e.g., “$100.00 / Monthly”
- Fund — which fund the recurring gift is directed to
- Status badge — ACTIVE (green), PAST DUE (red), CANCELLED (grey), or INCOMPLETE (yellow)
- Start date and next payment date
- Cancel button — cancel the subscription with a single click and inline confirmation
If you have no recurring gifts, a prompt links to the Give page to set one up.
Quick Actions
A Give Now button is available on the My Giving page, providing a convenient shortcut to the Give page for making a new donation.
Giving Overview Admin
The Giving Overview tab on the Giving Admin page provides a comprehensive dashboard of giving activity for the selected year. It combines high-level statistics, monthly trends, fund analysis, and payment method breakdowns into a single view.
Year Picker
A year dropdown at the top of the Overview tab controls which year's data is displayed. All five stat cards, the monthly table, the fund breakdown, and the payment method breakdown update when the year is changed.
Stat Cards
Five stat cards are displayed across the top of the dashboard:
Total Received
The total dollar amount of all completed donations for the selected year.
Donation Count
The total number of individual donations received during the year.
Donor Count
The number of unique donors who gave during the year (excludes anonymous gifts).
Average Gift
The average donation amount (total received divided by donation count).
Active Recurring
The number of currently active recurring gift subscriptions managed through Stripe. Click the Recurring tab for full details.
Monthly Giving Table
A 12-row table shows giving totals for each month of the selected year, making it easy to identify seasonal trends and compare month-over-month giving:
| Column | Description |
|---|---|
| Month | The calendar month (January through December) |
| Amount | Total donations received during that month |
A Total row at the bottom sums all monthly amounts, providing a quick cross-check against the Total Received stat card.
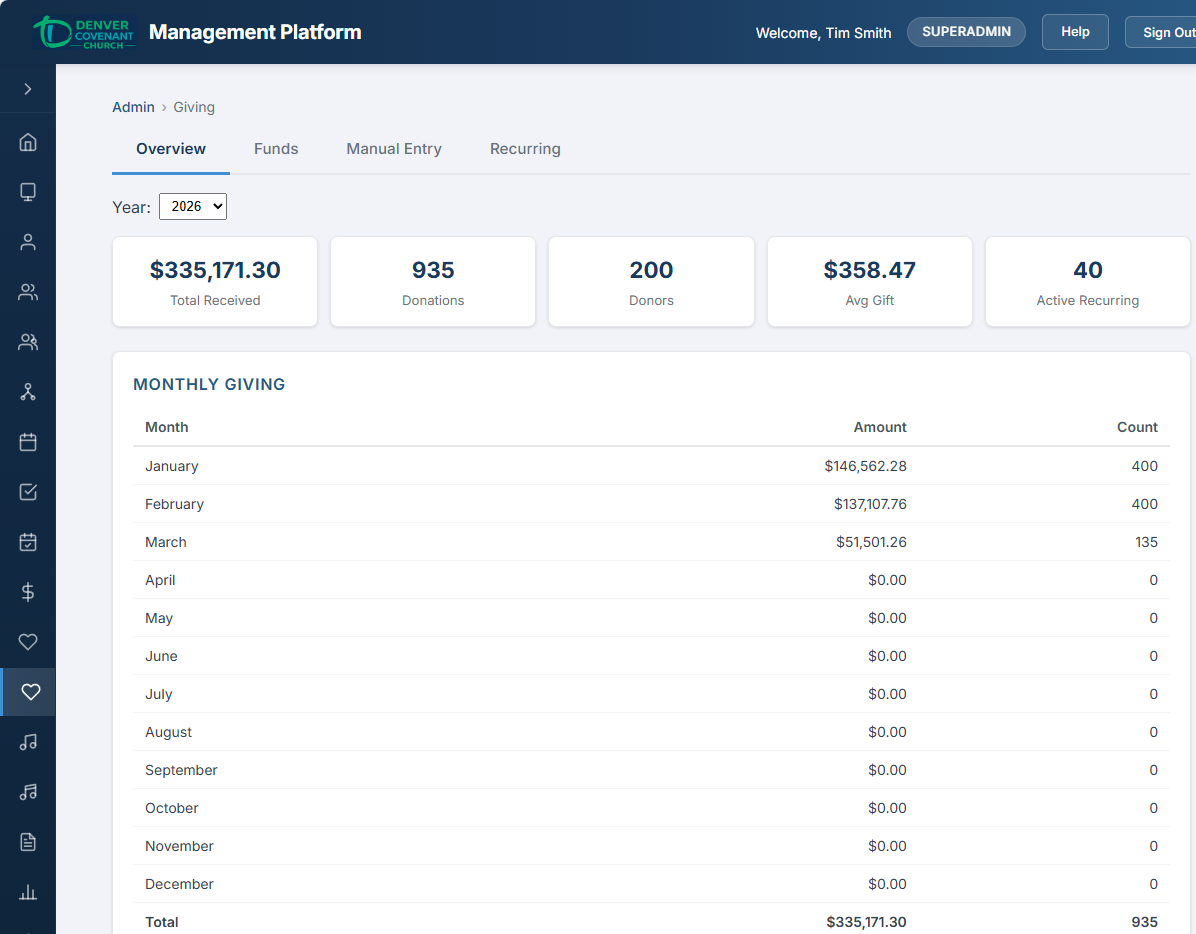
Giving admin overview — stat cards (Total Received, Donations, Donors, Avg Gift, Active Recurring) and monthly giving trends.
Fund Breakdown Table
This table shows how donations were distributed across giving funds for the selected year:
| Column | Description |
|---|---|
| Fund | The name of the giving fund |
| Amount | Total donations received by this fund |
| % | This fund's share of total giving, expressed as a percentage |
| Count | The number of individual donations directed to this fund |
Fund management — list of giving funds with edit panel.
Payment Method Breakdown Table
This table summarizes donations by how they were received:
| Column | Description |
|---|---|
| Payment Method | The method of payment (Stripe Card, Stripe ACH, Apple Pay, Google Pay, PayPal, Cash, Check, Other) |
| Amount | Total donations received via this method |
| Count | Number of donations received via this method |
Recent donations table showing donor, fund, amount, payment method, and status badge.
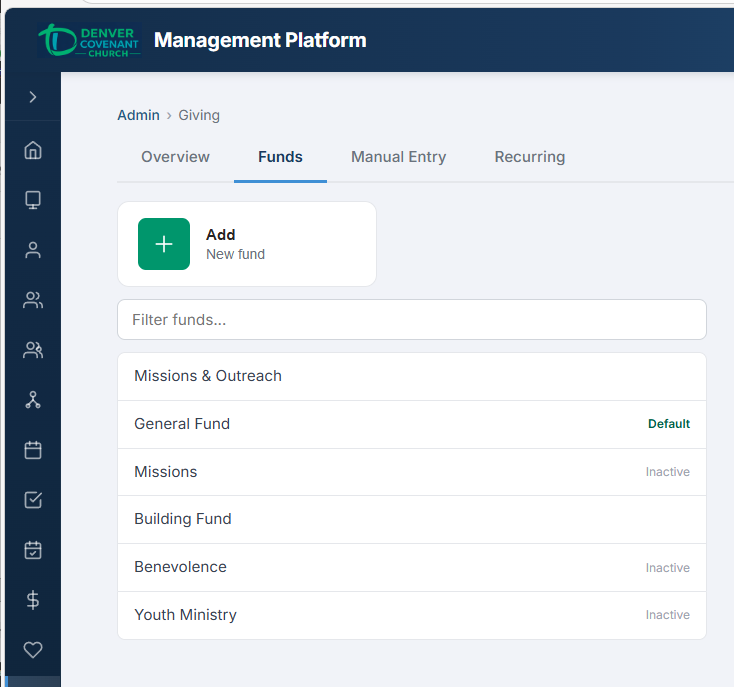
Fund Management Admin
Giving Funds define the categories donors can direct their gifts to. Common examples include General Fund, Building Fund, Missions, and Benevolence. The Funds tab on the Giving Admin page uses a list-and-edit layout for managing funds.
Fund Properties
| Field | Description |
|---|---|
| Name | The display name of the fund as it appears in the Give page dropdown and all reports (required) |
| Description | Optional text explaining the purpose of this fund (e.g., "Supports local and international mission partners") |
| Sort Order | Numeric value controlling the display order in dropdowns and lists. Lower numbers appear first |
| Default Fund | Checkbox — marks this fund as the one pre-selected on the Give page. Only one fund can be the default at any time |
| Active | Toggle to enable or disable the fund. Inactive funds are hidden from the Give page dropdown but their historical donation data is preserved in reports |
Layout
The Funds tab uses a list-and-edit layout. The left panel shows all funds in a scrollable list, ordered by sort order. Selecting a fund opens its edit form on the right. The currently selected fund is highlighted in the list.
Creating a Fund
- Navigate to Giving Admin from the sidebar and select the Funds tab.
- Tap + New Fund above the fund list.
- Enter the Name (required) and optionally a Description explaining the fund's purpose.
- Set the Sort Order to control where this fund appears relative to others in the Give page dropdown. Lower numbers appear first.
- Check Default Fund if this should be the pre-selected fund on the Give page. If another fund is currently the default, it will be automatically un-flagged.
- Leave Active toggled on (default). Turn it off only if you want to create the fund but not make it available for donations yet.
- Tap Save to create the fund.
Editing a Fund
- Select the fund from the list on the left.
- Update any fields in the edit panel on the right.
- Tap Save to apply changes.
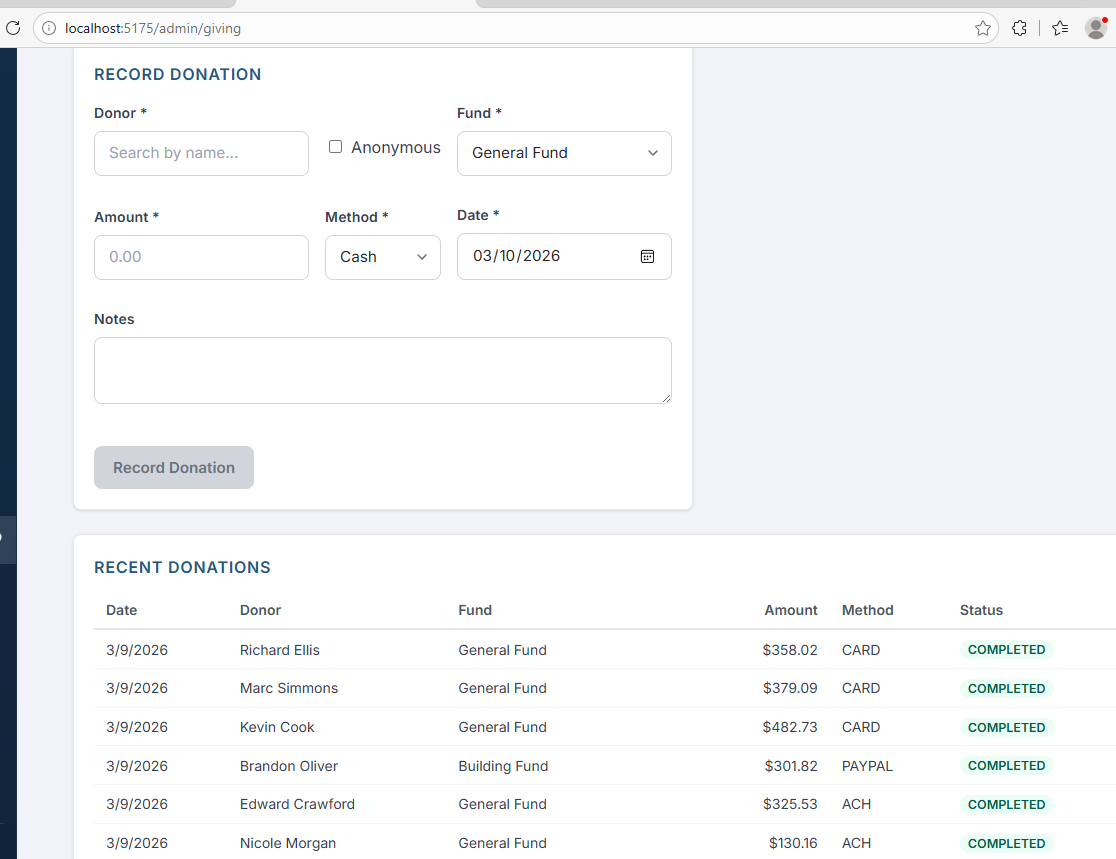
Manual Entry Admin
The Manual Entry tab on the Giving Admin page allows administrators to record donations that were received outside of the online giving system — such as cash placed in the offering plate, checks mailed to the church, or other offline gifts. This ensures that all giving is tracked in one central system for accurate reporting and donor records.
Manual Entry Form
| Field | Description |
|---|---|
| Person Search | Debounced search field — type a name to search the people database. Results appear as you type after a brief pause. Select the donor from the results |
| Anonymous | Checkbox — when checked, the person search is disabled and the donation is recorded without a donor. Use this for unidentified cash gifts |
| Fund | Dropdown to select which giving fund this donation should be applied to |
| Amount | The dollar amount of the donation |
| Payment Method | Select the method: Cash, Check, or Other. When Check is selected, an additional Check # field appears for recording the check number |
| Check # | Visible only when Payment Method is Check. Enter the check number for tracking and reconciliation |
| Date / Time | The date and time the donation was received. Defaults to the current date and time but can be adjusted for backdating (e.g., entering Sunday's offering on Monday) |
| Notes | Optional free-text notes (e.g., "Received in Sunday offering", "Mailed donation", "Designated for youth camp scholarships") |
Recording an Offline Donation
- Navigate to Giving Admin from the sidebar and select the Manual Entry tab.
- Begin typing the donor's name in the Person Search field. After a brief pause, matching results appear. Select the correct person. If the gift is anonymous, check the Anonymous checkbox instead.
- Select the Fund from the dropdown (e.g., General Fund).
- Enter the Amount of the donation.
- Choose the Payment Method. If selecting Check, also enter the Check # in the field that appears.
- Adjust the Date / Time if the donation was received on a different day than today.
- Optionally add any Notes for context.
- Tap Save to record the donation. A success message confirms the entry was saved.
Recent Donations Table
Below the manual entry form, a table displays the 20 most recent manually entered donations for quick reference and verification. The table includes the following columns:
| Column | Description |
|---|---|
| Date | When the donation was received |
| Donor | The donor's name, or "Anonymous" for unidentified gifts |
| Fund | Which fund the donation was recorded under |
| Amount | The dollar amount |
| Method | Cash, Check (with check number if entered), or Other |
| Status | The donation status badge (manually entered donations are typically COMPLETED immediately) |
Recurring Gift Management Admin
The Recurring tab on the Giving Admin page gives administrators a complete view of all recurring gift subscriptions across the church — active, past due, incomplete, and cancelled.
Summary Stats
Two stat cards at the top provide an at-a-glance overview:
Active Subscriptions
The count of currently active recurring gifts.
Estimated Monthly Revenue
The projected monthly income from all active recurring gifts, normalized across frequencies (e.g., a $100 weekly gift contributes ~$433/month).
Filters
Two dropdown filters narrow the table view:
- Status — All, Active, Past Due, Cancelled, or Incomplete
- Fund — filter by any giving fund, or show all funds
Recurring Gifts Table
| Column | Description |
|---|---|
| Donor | The donor's name, or “Anonymous” for anonymous gifts |
| Fund | Which giving fund the recurring gift is directed to |
| Amount | The recurring donation amount per cycle |
| Frequency | Weekly, Bi-weekly, Monthly, Quarterly, or Annually |
| Status | Color-coded badge: ACTIVE (green), PAST DUE (red), CANCELLED (grey), INCOMPLETE (yellow) |
| Start Date | When the subscription was created |
| Next Payment | The next scheduled charge date (active subscriptions only) |
| Actions | Cancel button for active or past-due subscriptions. Clicking Cancel shows an inline confirmation prompt before cancelling |
Admin Cancellation
Administrators with the giving.manage permission can cancel any donor's recurring subscription. Cancellation immediately:
- Cancels the subscription in Stripe (no further charges)
- Updates the status to CANCELLED in the database
- Sets the end date to today